Introduction
Like anything, creating a website with R Studio has it’s own pros and cons. I’ll quickly discuss what they are for me, but keep in mind that it may be different for you depending on your background knowledge.
🟢 Easy integration with R Markdown
🟢 One place for your public
slides/analyses/scripts/reports
🟢 Version control with Github
Pages
🟢 Free hosting with Github Pages
🟢 Automatic linking
and chronologic blogposts
🟠 Customization if fully possible, but
not intuitive
🔴 Experience with R Studio
🔴 Less intuitive
than, for example, wordpress environments
I am personally aware of three different packages for creating your website with R Studio:
Each of these methods has their own syntax, file structures, and customization options. I first created my website with Hugo/Blogdown, but in the end was unable to easily keep it up-to-date. For me the biggest issue was the file structure which I did not find entirely intuitive, especially when updating my website only once every few months. Distill is much more intuitive to use, but slightly limited in the types of pages you can create. For now it suffices my needs, and I already found some packages that will help me achieve pages similar to Hugo’s widgets.
Background Knowledge
This tutorial is suitable for you if you..
- … have R and R Studio installed
- … know how to install R packages
- … have a Github account
- … know how to use your Terminal (Mac) / Command Prompt (Windows)
- … have basic knowledge of Git
I will try and describe the steps as detailed as possible. However, I will not include directions such as “upper-right corner” because user interfaces are known to change. Instead I expect you to know how to work each of the elements/programs discussed above.
Creating the Website
Objective: Creating an empty/shell website
Distill has excellent documentation available. Some of the steps I describe here will also be included in their documentation with more/less detail.
R Studio
Install the
Distillpackage:
install.packages("distill")Create a new R Studio project (
New Project...>New Directory>Distill Website)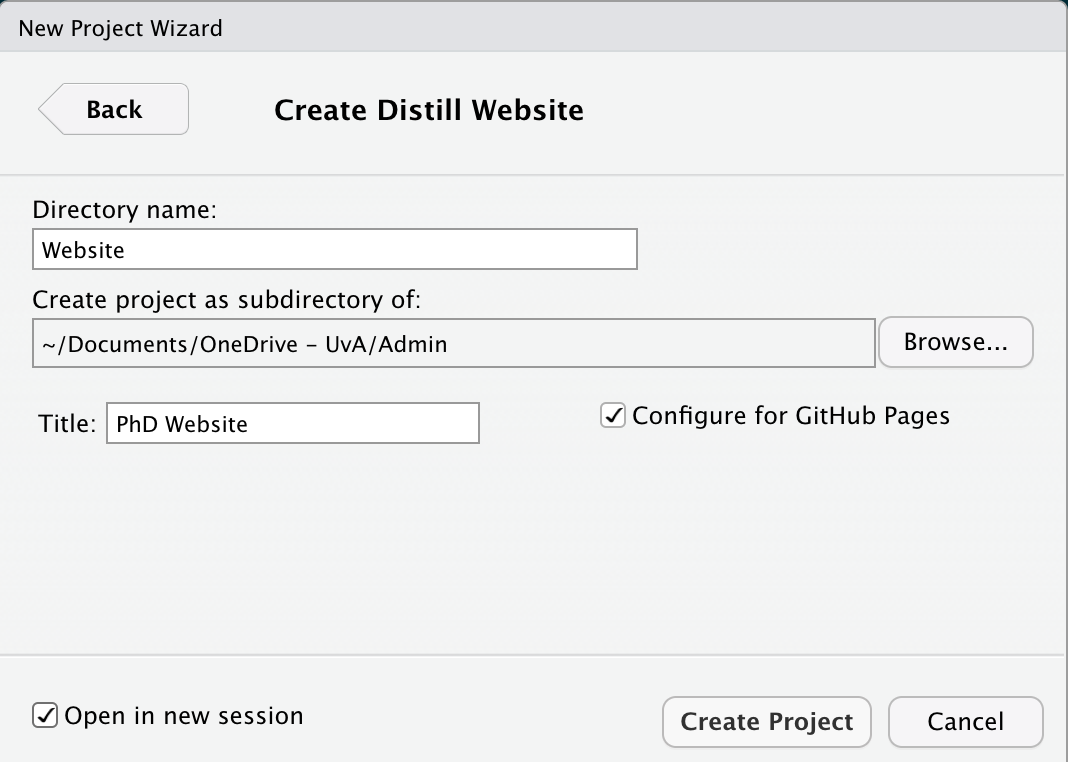
Directory name: the name of the folder that is automatically created for this new project. I named mine ‘Website’.Create project as a subdirectory of...: the folder where you want to store your website. I stored mine in the ‘Admin’ folder.Title: the name of your website which is shown in the ‘header’ of your website. This can easily be adjusted later on.Configure for Github Pages: please select this option as it prevents some manual steps later on.Open in new session: I chose to start this project with a new/fresh R Studio session, but this is not a mandatory step.
- Build the website:
rmarkdown::render_site()
Outcome: All
.Rmdfiles have now been converted to.htmlfiles and have been linked together with a menu-bar. Your empty/shell website is available to you locally in thedocsfolder of your project.
Creating a Github Page
Objective: Making your website available online.
In order to put your website online it must be hosted. I like to envision ‘hosting’ as a town (the provider) in an online world. I have opted to use the provider Github Pages because (1) it is free and (2) it forces me to version control my website. Other options are available, which are discussed in more detail in this Distill article.
Github
Create a new - empty and public - repository. Note the name must follow this convention for the Github Pages to work (cf. the Github Pages documentation):
USERNAME.github.io
Terminal / Command Prompt
- Open a new terminal at the folder where you stored your website
- Initialize git for the folder
git init - Add all files currently in the folder
git add -A - Commit the files with a commit message
git commit -m "Initialize Website" - Create the main branch
git branch -M main - Connect your local folder and the Github Repository
git remote add origin https://github.com/SHogenboom/shogenboom.github.io.git - Push the local files to the Github Repository
git push -u origin main
Github
- Open
Settings>Pages - Change the
sourceof the page to the sub-folder/docs. This tells your Github Pages that it should look for theindex.htmlfile in thedocsfolder.
Terminal / Command Prompt
- The previous step on Github has made changes to the repository
(
CNAME). These need to be pulled to your local instance of the repositorygit pull
Web browser
- Your website is now online @
https://USERNAME.github.io
Adding a Profile Page
Objective: Converting your homepage to a profile landing page
You can make your homepage (index.html) anything you
want. I wanted a sort of landing page with basic information about me.
In the Distill documentation I learned about the
postcards package which is a very easy way of creating profile
pages. Before you continue with the tutorial, take a look at their documentation to
choose your profile page theme.
Local
- Choose a picture or logo you want to include on your profile page
- Save the image in the website project. I chose to create a new
folder
imageswith the fileavatar.jpgin it.
R Studio
Create a new postcard:
postcards::create_postcard(file = "tmp.Rmd",
                            template = "jolla")
Copy the
yamlheader fromtmp.Rmdto theindex.Rmdfile and update with your personal information. My header now looks like this:title: "Sally A.M. Hogenboom" image: "images/avatar.jpg" links: - label: GitHub url: "https://github.com/SHogenboom" - label: Email url: "mailto:sally.hogenboom@gmail.com" output: postcards::jolla site: distill::distill_websiteYou can now remove the
tmp.Rmdfile again - we no longer need it!Re-build the website
rmarkdown::render_site(encoding = 'UTF-8')
Terminal
- Add all the files/changes
git add -A - Add an informative message for the version control
git commit -m "Add profile page" - Push the changes so they show up online
git push